When it comes to taking photos on your Macbook, you have a few different options available to you. You can record videos or take photos of documents with the Camera roll app. You can also use the Photos app to capture snapshots of whatever is happening at any given time.
We’ll be going into more detail about how to take screenshots on your Macbook later in this article, but for now, let’s explore how you can screenshot On Macbook How To Make It Easy To Screenshot . Let’s start by looking at what exactly a screenshot is and how you can create one yourself using the Photos app!
3 Easy To Screenshot or Print Screen on Mac

Image Source: Unsplash
How to screenshot on mac ?
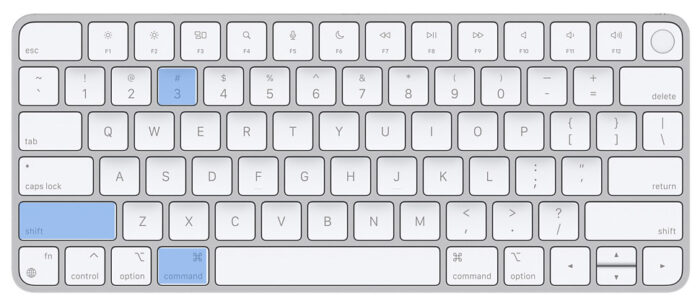
Press ⇧ Shift + ⌘ Command + 3 to capture the whole screen.

- Simply snap a screenshot by simultaneously pressing and holding the Shift, Command, and 3 buttons on your keyboard.
- If you see a thumbnail in the top right corner of your screen, you may alter the screenshot by clicking on the thumbnail. You also have the option of waiting until the snapshot is saved to your desktop.
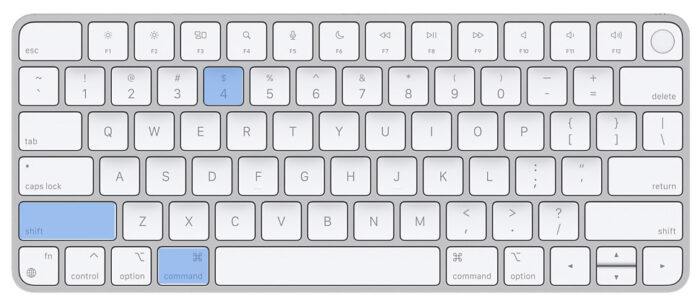
Use ⇧ Shift + ⌘ Command + 4 to capture part of the screen.

- Start by simultaneously pressing and holding down the Shift, Press Command, and 4 buttons.
- Select the region of the screen that you want to capture by dragging the crosshair. While dragging, you must press and hold the space bar in order to move the selection. Pressing the Escape (Esc) key will stop the screen capture from being taken.
- To capture a screenshot, you need to let go of the button on your mouse or trackpad.
- If you see a thumbnail in the top right corner of your screen, you may alter the screenshot by clicking on the thumbnail. You also have the option of waiting until the snapshot is saved to your desktop.
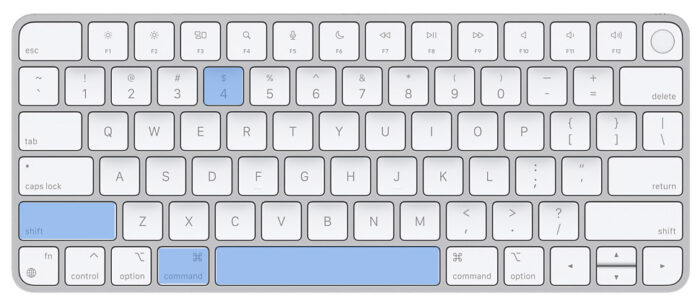
Use ⇧ Shift + ⌘ Command + 4 + Spacebar to capture a window or menu.

- To take a screenshot, first open the window or menu that you want to record.
- Shift, Command, the number 4, and the space bar need to be pressed and held simultaneously. The cursor will then transform into a picture-taking symbol. Pressing the Escape (Esc) key will stop the screen capture from being taken.
- To copy the information, click the appropriate window or menu. While you click the capture button, pressing and holding the Option key will prevent the window's shadow from being captured in the image.
- If you see a thumbnail in the top right corner of your screen, you may alter the screenshot by clicking on the thumbnail. You also have the option of waiting until the snapshot is saved to your desktop.
How Long Does It Take To Screenshot On Macbook?
A screenshot is a visual representation of what your device is displaying. You can take a photos of whatever is happening on the device, and then send those photos to your computer as a single-user photo album. This is great for sharing with friends and family, even if you don’t have the ability to write articles or blog about it. The Photos app can capture single-user photos, and you can turn those into a single-user blog or website.
- To take a screen shot, press and hold the Shift, Command, and 3 keys at the same time.
- If you see a thumbnail in the corner of your screen, you can edit the screenshot by clicking on the thumbnail.
Or, you can wait until the screenshot saves to your desktop.
You will then be able to build a picture album that is just accessible to yourself. Click the Settings button inside the Photos app on your Mac, and then click the Photos button. Choose the Photos app from the available options, and then pick the option to Create a New Photo Album.
You are free to give the picture album whatever name you choose. You have the option of starting a new thread or creating a picture that has already been shot and uploaded to a social networking site.
As mentioned above, you can take multiple photos in the Camera app when shooting videos or photos. So, as long as those photos are within the said camera’s memory, it’s easy to take a single-shot photo with the Camera app. If you want to save the whole thing for posterity, you can also use the Camera app to take multiple photos in one go, which is even more likely to berez.
Can You Screenshot On Your Macbook ?
There is a built-in camera in a Surviving Macbook Pro, but you can only use it to take pictures if you hold it with both hands. Therefore, your Macbook will not let you to snap photographs with a high resolution. You can take a single image or two pictures using a portable device like a laptop or other portable device, and then you can use the Photos app on your computer to transmit the pictures that you took to your computer.
It is also possible to shoot several photographs using the Photos app and then transfer them all to your computer with just one swipe. This is the method that we suggest using.
Conclusion
Your Macbook kicks off an age-old photograph creativity challenge with these amazing step-by-step instructions for taking a quick and easy photo of your most favorite thing. From there, you can take the shot and send it to us with an easy-to-reconcile Instagram or Twitter feed. All you have to do is to click “publish,” choose a photo format, and hit “screenshot.”
You can use the photo as a canvas, or you can use the beautiful photo gallery to organize your photos. If you’re looking for a quick and easy way to capture a photo of your favorite thing, without the need to go through the hassle of setting up a new account or having a ton of paper work to go through, this is a great option.


Leave a Reply
View Comments